
14 Chapter 13: Advanced Course Design
Much of what this manual covers so far would still fall under the category of traditional or standard online learning. Of course, don’t let terms like “traditional” or “standard” fool you – online learning is still relatively new in the larger picture of learning, and there is a lot we don’t know about it.
While there is no standard or threshold for what makes something “standard” or “advanced” course design, there are many ideas and structures (or lack of structure) that would be considered “cutting edge” or “experimental” by many. This chapter will briefly touch on a few of these that you can try in your courses. There are many others beyond these. If you can think of something that is outside of what is covered in this manual, but would be a good idea for your course – then search online to see if someone has already tried it. You might be surprised at what you find. For now, let’s take a brief look at several different ways to think outside of the standard course structure.
Self- Mapped Learning Pathways
This guide has covered many different ways of looking at learning, as well as many different philosophical ways of designing courses. You may be teaching a topic that clearly lends itself to one type of design or learning theory. If that is the case, then you have a clear path before you. However, you may be looking at the different options and thinking that there are several that may or may not apply, or that you have some learners that would appreciate different ways of approaching course content, or even learners with vastly different contexts that have vastly different educational needs. If that is you, then you may be wondering if it is even possible to accommodate such flexibility in your course without designing several different parallel courses.
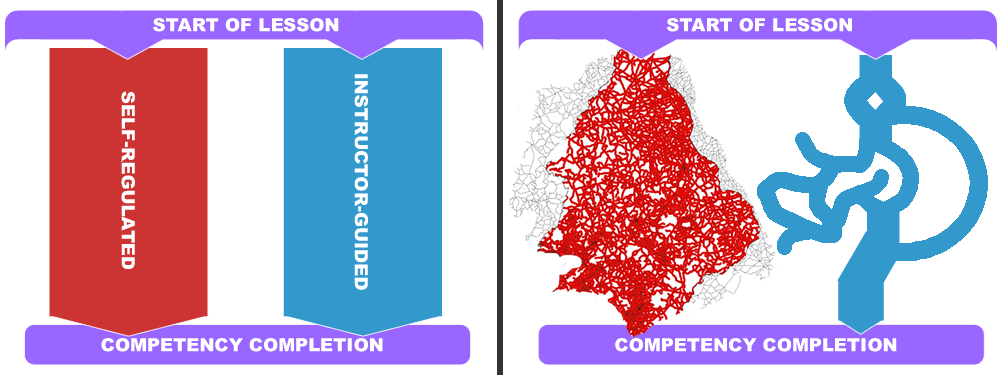
One possible way to approach this is through a design method called Self-Mapped Learning Pathways (Crosslin, 2018; Crosslin & Wakefield, 2016). The basic idea was initially called a dual-layer approach, because it entailed having two layers to a course (Crosslin & Dellinger, 2015; Kilgore & Al-Freih, 2017). One was an instructor-led layer that followed a defined pathway through course content. The other layer was a student-centered layer that allowed learners to create their own pathway through the course content. Because “layers” implies a hierarchy, the concept of layers was changed over to “modalities” (Instructor Centered or Student Centered) that are both equally valid (Crosslin, Dellinger, Joksimovic, Kovanovic, & Gaševic, 2018). Learners can choose either modality or both at any point in the course, and then change that mix as needed at any time (figure 1). Thus, the learners map their own pathway through the course structure and content.
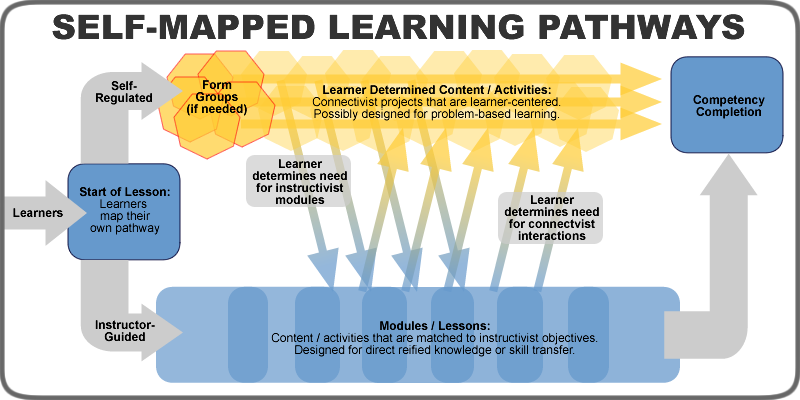
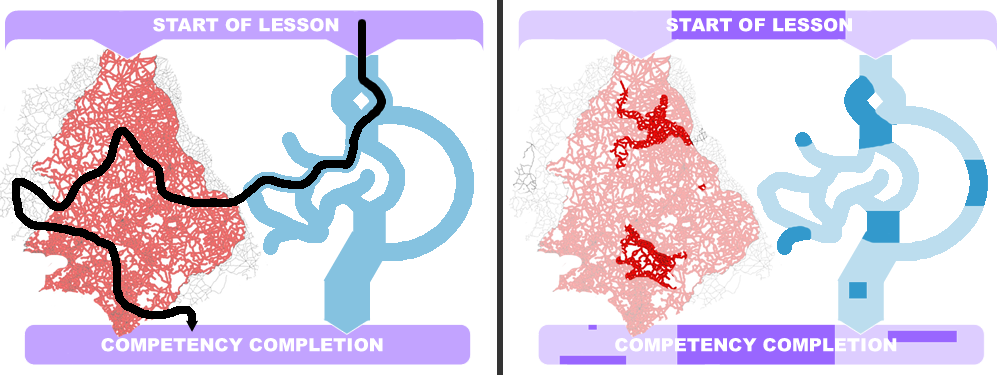
For example, a learner may come into a course, look at the instructor content and decide they are already familiar with it. They then decide to look at the content from their specific sociocultural lens by finding resources online. However, at some point, they run into something they aren’t familiar with, so they jump over to the instructor-centered content to find what they need to know. They see that there is an interesting discussion with the learners that are following the instructor-led path, so they also decide to participate in that, while blogging their own experiences on their website.Keep in mind that while this structure sounds like a fairly straight forward design process (left side of figure 2), the reality is that courses designed with this structure can (and often do) take on much more complex structures – full of different choices on the instructor-focused side as well as meandering options on the learner-focused side (right side of figure 2). On the right side of figure 2 below, the blue lines represent how the instructor-focused modality can still have different options and non-linear lessons. The red area represents the organically forming official options for learner-focused pathways, surrounded by the gray areas that represent the unofficial options that learners could choose to add to their pathway as they create and follow their learning map.
Also consider how learners may take different pathways through the course design that are not straight (or even non-linear). For example, the left side of figure 3 showcases a meandering learning pathway, while the right side showcases how a learner might pick and choose various parts at different times. Your learning context may not allow for this much flexibility, but keep in mind these possibilities if you have that option.
The interesting flexibility behind this design is that it has options for beginners that just want to follow instructors, as well as options for experts that want to go deeper (and for those that fall somewhere in between the two). For more information on the structure, see these blog posts (mostly about MOOCs that implemented this design, but still applicable to any online courses in many ways):
- “Designing a Dual Layer cMOOC/xMOOC” by Matt Crosslin
- “Digging Into What “Choice” is in Customizable Modality/Dual-Layer” by Matt Crosslin
- “Every Choice is Awesome. Every Path is Cool When You’re in #HumanMOOC” by Matt Crosslin
Various research projects have looked into the pathway options learners have chosen in this model (Crosslin, 2016; Crosslin, Dellinger, Joksimovic, Kovanovic, & Gaševic, 2018), how learners have navigated autonomy in this model (Dawson, Joksimovic, Kovanovic, Gaševic, & Siemens, 2015), and the issues that various technologies utilized in designing for this model have cause learners (Rose, et al., 2015).
Creating a Learning Pathways Course
While at first glance, it might seem that this design methodology requires creating two completely different versions of the same course. However, the best way to look at the design process is not as two separate courses, but as one way to truly accomplish learner-centered self-determined learning. There are three overall steps to the process:
- Create a set of competencies to guide the instructor-led modality and provide suggestions for the learner-centered modality.
- Design the instructor led modality based on objectives that will accomplish the competencies.
- Create suggestions and scaffolding for assisting learners with the transition from the instructor-centered modality to the learner-centered modality. This is where many learners will have the least experience, and therefore will need the most help.
The biggest thing to remember is that the key to this form of design, as with any learner-centered design methodology, is for you as the instructor to release control. This will mean that learners will need more time to adjust and map their own pathway. It also means you will need to not overwhelm yourself with grading on the instructor-focused modality. You will be answering a lot of questions and providing a lot of guidance, so make sure to build time in for that. Also keep in mind that this design methodology is not an “all or nothing” idea. You can take the parts of it that make sense for your course, or slowly ease yourself into it over several courses. Learning gets messier the more it moves away from centralized control, so get ready for flexibility if you decide to go down this path. Leigh A. Hall has written a series of blog posts on how she wrestles through these issues – a few sample ones are listed here:
- “Documenting Customizable Pathways” by Leigh A. Hall
- “Dual Pathways in Online Learning” by Leigh A. Hall
- “The Messiness of Online Teaching” by Leigh A. Hall
Objectives and Competencies
Both objectives and competencies have been covered in this manual already. You could actually switch numbers 1 and 2 in the previous three step process if you already have objectives and a full course. Just start with the objectives you have for a course and start converting those into competencies. A quick and imperfect way to start that is to remove the conditions and criteria from your objectives, just leaving the behavior to form the foundation of the competency. The main idea to keep in mind is that your competencies will still need to cover your topic well enough to still accomplish the overall goal of the course, but flexible enough to allow for alternate pathways (you might even consider letting your learners remix or rethink your competencies as their own). For a bit more detail on creating competencies out of objectives, please see:
- “Bridging Learners From Instructivism to Connectivism” by Matt Crosslin
Designing the Instructor-Focused Modality
The main thing to keep in mind when designing the instructor-focused modality is to keep it focused on the instructor. This doesn’t mean that you leave out any student group work or social interactive activities. Far from it – you need to make sure that this modality is a well-designed instructional pathway. Think of what you would do for learners that are completely new to the topic you are covering, and guide them down that path. Just remember that some learners may be coming in and out of this modality as needed, so be sure to avoid any long term repeating group work that could suffer from learners changing modalities. Of course, on the other hand, it can also be helpful to have groups step out into their own learning pathway together, depending on the course topic. Just remember that you don’t want to force learners into learner-centered or connectivist activities – they need to choose those options for themselves.
A quick note about assessment: grading projects and activities does become difficult when learners are creating their own pathway. Many of the suggestions of effective assessment covered in Chapter 9 would help here. Open rubrics can be one way to grade across modalities, especially if you focus on what the learners actually learned and not the format of how they proved their accomplishments. In this design modality, it is up to the learner to demonstrate what they have learned. They can do so by following your suggestions in the instructor-focused modality, or by creating a different artifact in the student-centered modality. So instead of focusing on page numbers and word counts, look at the competency itself and evaluate solely on that.
Scaffolding Learners to Self-Mapping
Most learners are used to following the instructor, so they might need help transitioning into mapping their own pathway. Learners will need to develop higher levels of self-direction and drive to be successful in a course designed like this. You will probably need to constantly remind them that they can take this level of control over their learning pathway, as well as answer questions about what you think about their ideas. Therefore, you should approach this design methodology as more of a conversation that opens up over time. You can help learners think through some of these issues by providing scaffolding and example ideas throughout the course. One example of this has already been covered in Chapter 6 in the section on Assignment Banks. Whenever you create an assignment in the instructor-centered modality, you can also list some alternative assignment ideas or artifacts to draw learners to the self-mapped pathway. Others have tried to add an element of games to their assignment banks by adding point values to assignments in the bank (see the next section on gamification). You can also create guides for other tools that learners could use, or even interactive maps of their options (click here for an example in one MOOC). Or, the platform you use might have learning analytics tools that can help you and your learners with scaffolding. For more details on scaffolding in this design scenario, see:
- “Visual Flow of Learner Tools in the Dual Layer MOOC” by Matt Crosslin
The biggest question with this design methodology is how does a learner create a learning pathway? There are probably many different ways to look at this issue, but one example is documented here:
- “Creating a Self-Mapped Learning Pathway” by Matt Crosslin
Gamification and Game-Based Learning
Using games in learning is not a new concept. Most of us have played learning games at least a few times in our education. However, many are not aware how diverse or developed the idea of games in learning is. From adding game elements to role playing to video games to simulations to virtual reality to text-based scenarios and on and on, there are many options for combining games and learning. However, as you read through this brief overview, please keep in mind things like accessibility and access. Not all learners have access to high level computing equipment, and others have accessibility issues with their eyesight or hearing or other issues that limit how they can experience some of these ideas. Please keep in mind those students when considering games in education, and make sure to keep your course activities accessible to all.
The intersection of games and learning is a large area that could fill its own book (and already has several times over). There are also differences between gamification, educational gaming, game-based education, and other terms. We will cover a brief overview here with links to more information if you would like to explore these ideas for your courses.
Gamification
In an education setting, gamification is the addition of game-design elements to an overall educational context. This could be anything from using stars or level-up game elements in place of grades, to educational quests, to game-based rewards systems in courses. This can be a simple and inexpensive addition to a course, or a complex and expensive design process. If you have ever experienced an element of a game that you thought might make your course more interesting, this is a great way to add it. For more ideas, see these articles:
- “4 Ways To Bring Gamification of Education To Your Classroom” by Suzanne Holloway
- “Gamification in Education” by Vicki Davis
- Gamification of Learning
Game-Based Learning/Educational Games
Game-Based Learning is exactly what its name states: basing education on one or more games that were either designed for education, or that have some kind of educational value (even if not designed specifically for education). Many people think “video games” when they hear of this, and while video games are a big part of game-based learning, it could also include simulations, problem-based learning, board games, re-enactments, or other non-digital means. Some teachers find and purchase games that are already designed for the purpose that they desire, while others attempt to build the games themselves or have groups of learners create games. This takes an extensive amount of planning (and possibly funding as well), but the rewards are typically very rich. If you are interested in this idea, see these articles:
- “The Difference between Gamification and Game-Based Learning” by Steven Isaacs
- “Game-Based Learning: What it is, Why it Works, and Where it’s Going” by Jessica Trybus
- Educational Game
Augmented/Virtual Reality
The concepts of augmented reality (AR) and virtual reality (VR) have been gaining a fair amount of attention recently. However, it is too early to see if they will become trends or footnotes in education. Historically they have both tended to require expensive equipment and design to create, but recent advancements in technology have turned most smart phones into AR/VR machines – sometimes with no added equipment, and other times with a cheap $10 headset. The basic idea of augmented reality is that it is a technology that layers or augments digital content onto live video of the real world around us. Think of games like PokemonGo! or mobile apps that layer driving directions over live video on your phone. Virtual reality is usually a more immersive experience, typically cutting the user off from experiencing the real world while they are immersed into a video/audio 3-dimensional realistic simulation. Much of the work in the VR field seems to center on either simulation of experiences (virtual field trips to historical sites, nursing process simulations, etc) or more immersive passive experiences (go inside a working heart, watch gorillas in their native habitat, etc). More experimental ideas allow learners to create art in 3-D spaces, create their own AR apps, or build their own games in VR. This area is still new (and often inaccessible to many), but if you are interested, here is more to read:
- Virtual Reality for Education
- “Real Uses of Virtual Reality in Education: How Schools are Using VR” by Kelly Walsh
- “Virtual Reality And Augmented Reality In Education” by Leticia Lafuente López
- “Augmented Reality Brings New Dimensions to Learning” by Todd Nesloney
- If you want to think deeper about possibilities for immersion beyond simulation, we would recommend the work of eleVR
eXperience Play
Game-based Education and Gamification can seem overwhelming at first. If you are interested in games, but not sure where to start, one place to consider is the eXperience Play professional development website. Created by two educational gamers that you might have met showing off their games at various Ed-Tech conferences (Keegan Long-Wheeler and John Stewart), eXperience Play is “meant for anyone interested in building games to use in the classroom or wanting to facilitate student game development as part of their courses.” You can read through the lessons online, and begin experimenting yourself. These lessons teach you about text-based games in a free and easy to use program called Twine. This approach leads you through a method that is easy for even the newest of beginners to try, but creates games that are highly accessible to most learners. Take a look for yourself to start learning:
Mobile Learning
Mobile devices have gone from novelty to near necessity in a relatively short amount of time. Because of this, many have started to look into the educational opportunities these devices could afford. From consuming educational content anywhere that a learner goes, to designing learning activities that get learners to interact with the world around them using their phone as part of the exercise, there are many uses for mobile devices in learning (sometimes referred to as m-learning or mobile learning). However, please keep in mind that not all phones are the same, and not everyone even has a phone (no matter what you think you might observe around you). The first thing to keep in mind when considering mobile learning is what you will do for learners that don’t have access to phones, or phones with advanced features, or even phones without Internet access. Make sure to include options (or allow learners to create their own options) that are flexible for various levels of phone ownership. Also keep in mind that accessibility issues also apply to mobile content and activities as well – you will have students that have sight or hearing or other accessibility issues that will need to be considered in this area.
Mobile Content
One form of mobile learning is the creation or scaling of content or activities with the intent of having learners utilize it on mobile devices. This can be anything from creating mobile friendly versions of content or activities to creating specific smartphone applications (apps) that work natively on mobile devices. This is an area that most online instructors should be aware of, as in some parts of the world, mobile devices are much more common than laptops or desktop computers. With this in mind, the important questions to ask yourself are: does my content adjust to mobile devices? Do the video or audio files in my courses work on smartphones (and can they be downloaded to view in places that have poor network connection)? Are the activities you have in your course mobile friendly (some discussion forums, for example, don’t adjust to mobile devices very well)? Some LMS providers (as well as tools like WordPress) have been offering mobile friendly options – or even dedicated apps – for a long time. Your learners will benefit greatly if you know how those work, and how you might need to adjust content and/or activities for apps or mobile devices.
Using Mobile Devices in Context
Another way of looking at mobile learning is to utilize the capabilities of mobile devices within the context of learners’ everyday lives. For example, are they learning about architecture, and could take pictures of examples of architecture in the world around them? Are you studying weather patterns, and they could capture videos of weather examples? Can learners go on a museum tour and take notes on their phone as they walk through exhibits? Maybe they can meet with an expert in your field and record the interview on their phone? There are many possibilities, but the idea is for learners to use their devices to interact with the world around them as they go throughout life. You or your students could even venture into mobile app creation in a more self-determined learning method, as well.
There are a large number of possibilities when it comes to mobile learning. If you are interested in learning more about this area, here are some ideas for articles to look into:
- “M-Learning”
- “12 Principles of Mobile Learning”
- “The Ultimate Teacher’s Guide To Creating Educational Apps” by Jeff Dunn.
- This article suggests some expensive app builders, but there are free ones: “5 Simple Tools For Teachers To Create And Publish Apps Of Their Own”
Rhizomatic Learning
Rhizomatic learning is a learner-focused design methodology based on the guiding principle of “the community is the curriculum” (Cormier, 2008). Many educational models and contexts have been created through the years that allow learners to design and determine their own learning; however, many of these still contain some type of directive or oversight from the instructor. Others will focus on having some type of class voting system that will give learners some control to determine the course structure at the beginning, but then solidifies this design early on without allowance for change or individual variations for personal needs.
Rhizomatic learning is different from these other forms of learner-centered design in that learning is mapped by the learning community throughout the whole process, always with the ability to change or encompass variations for individual learners. As Cormier (2008) states, the “community acts as the curriculum, spontaneously shaping, constructing, and reconstructing itself and the subject of its learning in the same way that the rhizome responds to changing environmental conditions” (para 13). This way of approaching education uses the rhizome as a metaphor because “a rhizomatic plant has no center and no defined boundary; rather, it is made up of a number of semi-independent nodes, each of which is capable of growing and spreading on its own, bounded only by the limits of its habitat” (Cormier, 2008, para 4).
In some ways, this may seem to be a way to create a course without planning. However, keep in mind that many learners may not be ready for this form of shifting-structure learning, so you may have to spend some time scaffolding learners into this model, possibly by utilizing self-regulated, self-directed, and then self-determined learning as stepping stones into rhizomatic learning. Sometimes it helps to have learners look at course goals and learning objectives as something more like “learning subjectives” that are their own self-determined goals.
A special note here: this way of learning may not work in all contexts for all topics. However, if you are interested in trying this idea out with your course, here are some suggested resources to help out:
- “Rhizomatic Education: Community as Curriculum” by Dave Cormier
- “Rhizomatic Learning”
- “A Practical Guide to Rhizo15” by Dave Cormier
- “What is it Like to Learn and Participate in Rhizomatic MOOCs? A Collaborative Autoethnography of #RHIZO14” by Maha Bali, Sarah Honeychurch, Keith Hamon, Rebecca J. Hogue, Apostolos Koutropoulos, Scott Johnson, Ronald Leunissen, & Lenandlar Singh
- “How the Community Became More Than the Curriculum: Participant Experiences In #RHIZO14” by Sarah Honeychurch, Bonnie Stewart, Maha Bali, Rebecca J. Hogue, & Dave Cormier
References
Cormier, D. (2008). Rhizomatic education: Community as curriculum. Innovate 4(5).
Crosslin, M. (2018). Exploring self-regulated learning choices in a customisable learning pathway MOOC. Australasian Journal of Educational Technology, 34(1), 131-144. https://doi.org/10.14742/ajet.3758
Crosslin, M. (2016). Customizable modality pathway learning design: Exploring personalized learning choices through a lens of self-regulated learning (Doctoral dissertation). University of North Texas, Denton, TX.
Crosslin, M., & Dellinger, J. T. (2015). Lessons learned while designing and implementing a multiple pathways xMOOC + cMOOC. In D. Slykhuis, & G. Marks (Eds.), Proceedings of Society for Information Technology & Teacher Education International Conference 2015 (pp. 250-255). Chesapeake, VA: Association for the Advancement of Computing in Education.
Crosslin, M., Dellinger, J. T., Joksimovic, S., Kovanovic, V., & Gaševic, D. (2018). Customizable modalities for individualized learning: Examining patterns of engagement in dual-layer MOOCs. Online Learning Journal, 22 (1). 19-38. http://dx.doi.org/10.24059/olj.v22i1.1080
Crosslin, M., & Wakefield, J. S. (2016). What’s cooking in the MOOC kitchen: Layered MOOCs. TechTrends, 60(2), 98-101. https://doi.org/10.1007/s11528-016-0036-5
Dawson, S., Joksimovic, S., Kovanovic, V., Gaševic, D., & Siemens, G. (2015). Recognising learner autonomy: Lessons and reflections from a joint x/c MOOC. Proceedings of Higher Education Research and Development Society of Australasia 2015, Melbourne, 117-129.
Kilgore, W., & Al-Freih, M. (2017). MOOCs as an innovative pedagogical design laboratory. International Journal on Innovations in Online Education, 1(1). http://doi.org/10.1615/IntJInnovOnlineEdu.2016015210
Rose, C. P., Ferschke, O., Tomar, G., Yang, D., Howley, I., Aleven, V., Siemens, G., Crosslin, M., Gasevic, D., & Baker, R. (2015). Challenges and opportunities of dual-layer MOOCs: Reflections from an edX deployment study. Proceedings of the 11th International Conference on Computer Supported Collaborative Learning (CSCL 2015). Gothenburg, Sweden.
