
Chapter 3: Tutorial Content and Organization
3.1 PDF Organization and Content
This section will first explain what sections are necessary in a PDF tutorial and how to create table of contents in Word and Google Docs.
Learning Objectives
After you read this section, you will be able to
- define front matter, introduction, safety signal phrase, conclusion, and back matter
- create a table of contents in Word and Google Docs
- write and design all sections of your tutorial effectively
- convert your document to a PDF
What is included in front matter?
Front matter includes all information prior to the introduction of a document. For tutorials, and many other genres such as reports, front matter is the title page, table of contents, and list of tables and figures, but it can also include a foreword, preface, and copyright information.
Title page
The title page is the user’s first interaction with the document and perhaps with your company. If you are writing for a specific company, make sure you check their branding requirements since the document represents them. You will want to use the correct color palette, font style, logo, and images that have been approved by the company, which you can find in the company style guide, another genre of technical document. Figure 3.1.1 is the title page to Beyond Gaming, which is a tutorial written for UCF faculty so they can learn how to use Discord in their courses.

If you are not writing for a specific company, then you have more freedom in your design choices for the title page and all content within the document.
Your title page, of course, needs the title of the document. The word choice and tone of the title should relate to the topic directly and appeal to your specific audience. The title should be in a large, easy to read font, so be careful of choosing a font style that is too ornate or in script since many users can’t read fonts that look cursive.
The logo of the software platform and company should be clearly displayed on the title page as well as any other design choices, such as borders.
You can choose to put other images on the title page as long as they relate directly to the topic of the tutorial.
Table of Contents
The table of contents needs to be placed immediately after the title page, but don’t worry about designing this until after you have finished writing, designing, revising, and editing the entire tutorial since movement of content, headings, images, and etc., will absolutely affect page numbers.
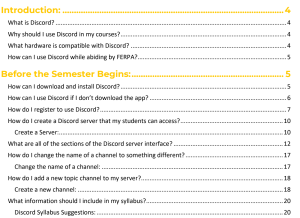
Your Table of Contents heading should be set at a level one, and you should design your table of contents to look consistent with the rest of your tutorial. Notice in Figure 3.1.2 how the design of this table of contents is similar to the title page from Figure 3.1.1.
When using Word, you need to use Word Styles for all headings. After you have formatted your headings, written your content, designed your document, and revised and edited, you are finally ready to create your table of contents.
To add a table of contents in Word:
-
- Put your cursor at the front of your Introduction level one heading

Figure 3.1.3 Cursor at the beginning of <H1> - Click Insert on the toolbar
- Click Page Break: This will move all content starting at Introduction to the top of the next page.
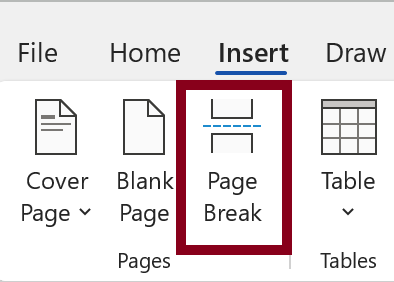
Figure 3.1.4 Click Page Break - Click References on the toolbar
- Click Table of Contents at the far left on the new toolbar
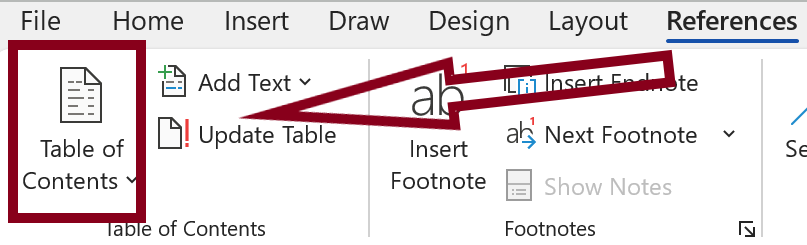
Figure 3.1.5 Click Table of Contents tool - When the new option window opens, click Custom Table of Contents
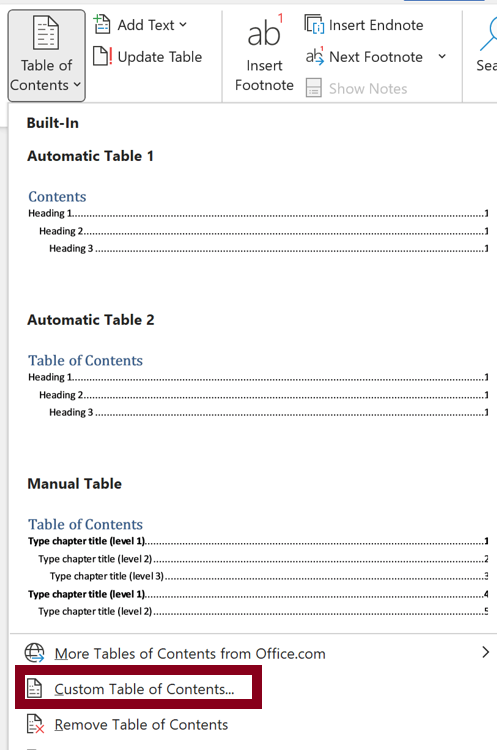
Figure 3.1.6 Click Custom Table of Contents tool - When the new dialog box opens, click Modify
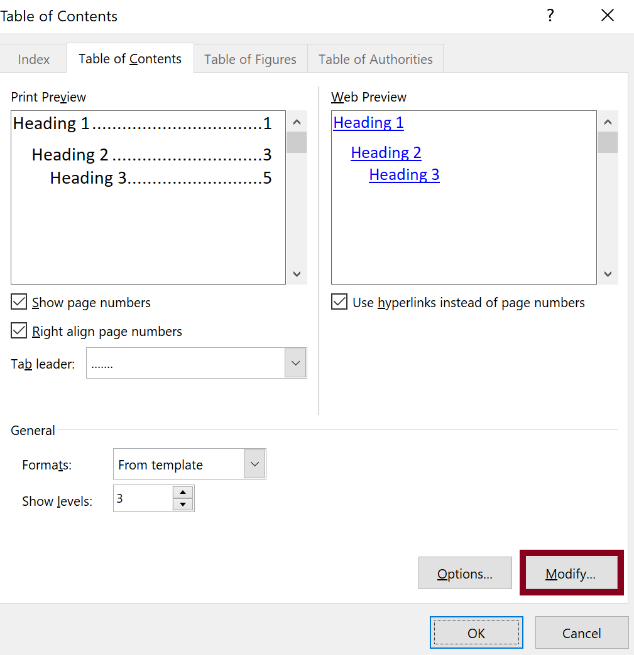
Figure 3.1.7 Modify button for Custom Table of Contents - When the Style dialog box opens, click Modify
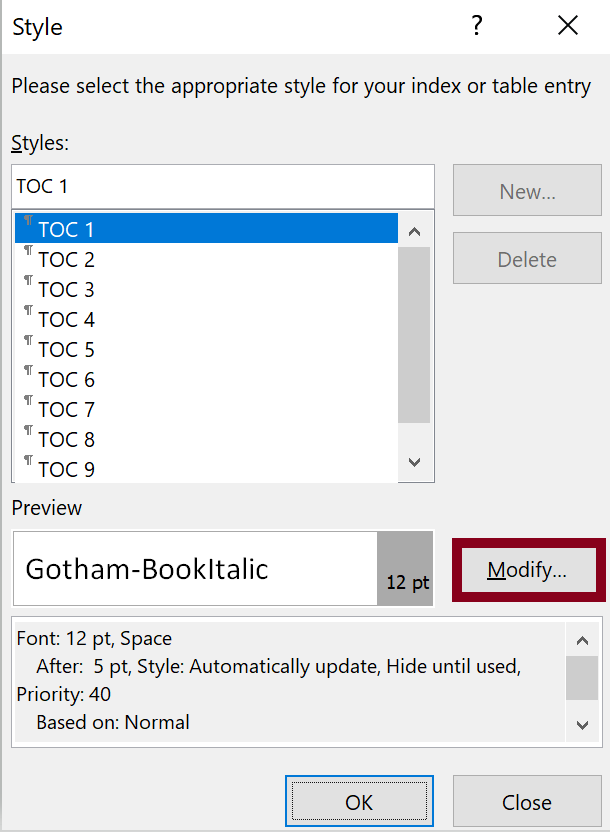
Figure 3.1.8 Modify button for <H1> - When the Modify Style dialog box opens, choose the font style, font size, and color under the Formatting heading that matches the design of your document
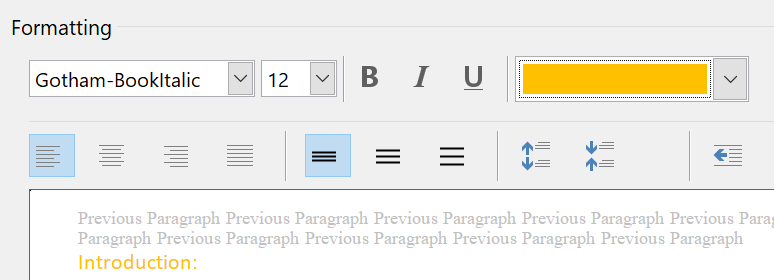
Figure 3.1.9 Choose font style, size, and color for <H1> - Click OK at the bottom of the dialog box
- Repeat the process for each heading level
- When each heading level is reformatted, click OK and the table of contents will display
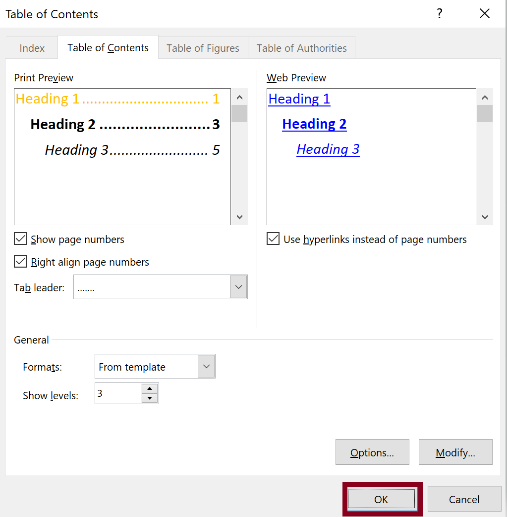
Figure 3.1.10 Ok button to enable font choices
- Put your cursor at the front of your Introduction level one heading
If you are using MacOS, please read this Create and Work with Documents on Mac webpage. You can also format using headings and a table of contents tool in Google Docs.
To add a table of contents in Google Docs:
-
- Use the headings tool to format your different level headings. See page X of this tutorial for instructions.
- Put your cursor at the front of your first level one heading
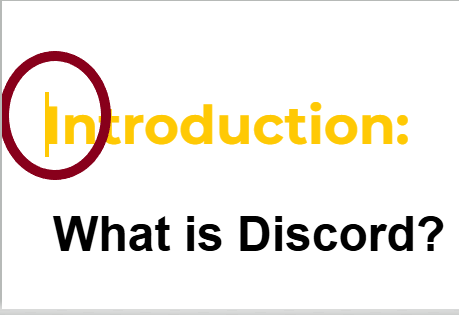
Figure 3.1.11 Cursor at the beginning of - Click Insert which will open new options
- Click Table of Contents at the bottom and new options will open
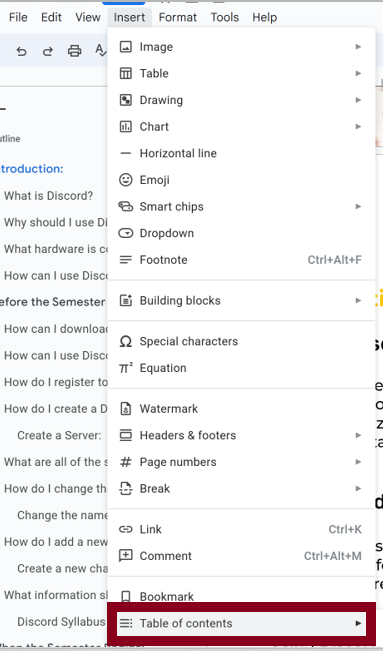
Figure 3.1.12 Table of Contents tool - Click the middle dotted table of contents choice
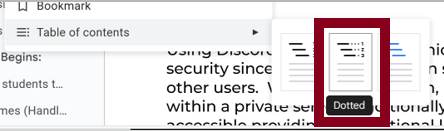
Figure 3.1.13 Dotted Table of Contents tool A table of contents will appear on the page with a dotted line extending from the headings to the page number automatically.
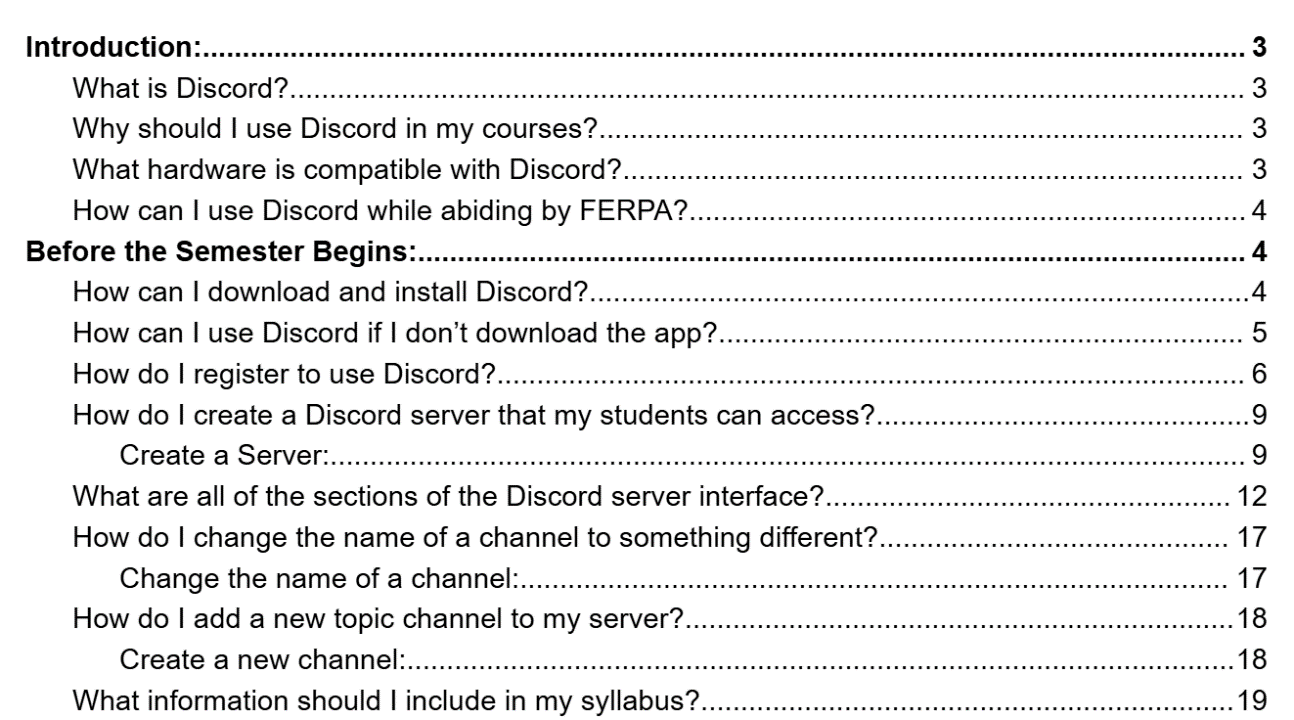
Figure 3.1.14 Properly formatted table of contents
You should also hyperlink sections of your document to the table of contents, but you don’t do this until you convert your document to a PDF.
List of Tables and Figures
A list of tables and figures is formatted just like a table of contents, but it includes only the figure numbers, names, and page numbers. This can be very helpful to your audience when you include many images in your document, but for our purposes, including a list of tables and figures is optional.
How does the user know when a new section of a document begins?
Just as with this tutorial, you need to signal sections to your user by creating headings: first, second, third, fourth, and sometimes fifth level headings. These headings need to be topic based to give the audience a clear idea about what the content in that section will include.
Chapter 6 of this tutorial provides instructions on how to format and design headings, but for now, just know that you need to plan how to write and organize your topics in clear groupings of information. Groupings of information, similar to groupings in design (also discussed in Chapter 6), means that the content is logically related.
After each heading, make sure you write a brief explanatory paragraph stating more directly what information will be discussed in the section or subsection.
The following subsections, explains the organizational structure of a tutorial and what information goes in each section.
What is included in the introduction or overview section?
Your introduction is the beginning of your deliverable and should provide important context for your audience. Your introduction section should include
- an explanation about the software
- historical research about the software and/or company who developed it when necessary
- the purpose of the document
- a description of the intended audience
- the skill level necessary to perform the tasks (Tebeaux & Dragga, 2018)
- the hardware and computer systems needed (Barker, 2003)
- the approximate time it will take to complete tasks (Barker, 2003)
The length and depth of the introduction depends on the length and depth of your document; for example, if you are tasked with writing a 2-page simple set of instructions, your introduction should be no more than one or two very brief paragraphs. However, a 50-page tutorial should include a much longer developed introduction section.
Essentially, the introduction section “gets your audience up to speed,” so users can complete the tasks.
In Industry
As discussed in the previous sections, when you write in industry, you must make sure that your content is clear, accurate, and specific for your audience, with whom you have had several conversations. As the Technical Writing Process image at the top of this image shows, usability testing is the center of the figure. Through your discussions with your audience, you need to determine what they need, how they feel, what they know, what their goals are, and how they complete their job duties.
Your introduction needs to address these concepts by connecting your topic, purpose, and genre directly.
In School
For your tutorial, you are writing about a specific software platform for your audience, and you need to provide background information about:
-
- The software, including the company who created it, what the software does, why it is useful, and a hyperlink to its website. You can include the history of the company and software, but you must cite it in APA 7.
- A statement about who your specific audience is and what they should already know before working through your tutorial
- The purpose of your tutorial and why your audience should use this document
In both industry and school, you will want to include a list of tools, materials, and parts needed, if any, as well as the time it takes to complete the project so the audience can plan their work time appropriately.
What is included in the body section?
The body section of your document includes topics, details, and content appropriate for your genre and audience. Your level one section headings need to be categorized clearly and can be separated into chapters, which may be more familiar to your audience. Each level one heading should be focused on a broad topic when you can then narrow down in level two and level three headings, similar to the sections and headings in this tutorial. For help on formatting headings, please refer to chapter 6 of this tutorial.
For your tutorial, you need to include
- the steps needed to accomplish goals, which includes:
- one action
- imperative voice
- numbers in chronological order
- figures and tables immediately next to or below the corresponding step (see chapter 5)
- lines of code, if relevant
- relevant terms and definitions, depending on audience skill level
- explanatory information, such as the result of a task
- an appropriate organization of the content broken down into subsections
- safety signal phrases:
- Danger: risk of serious injury or death
- Warning: injury
- Caution: damage to computer or program
- Notes: extra important information that should be set off from main text
At this point, you want to focus on your outline and how you organized your main topics. Begin to fill in content and separate the sections and subsections into paragraphs, which should be short and easy to scan.
Think about how a user would approach the software and add content that is useful WHEN it would be needed. For example, since you are writing as you use the technology, think from your audience’s perspective and consider these questions:
- How does your audience access the platform?
- How do they download and install it?
- How do they create a log in or profile?
- How do they fix settings or set up privacy elements?
- How do they navigate the interface? You could organize the body section spatially according to the toolbar start on the left side and moving right with each section of your tutorial explaining each individual tool.
- How can you explain important concepts or provide definitions?
- How can you construct easy to read paragraphs and numbered steps (see chapter 5)?
- What images should you include for your steps (see chapter 6)?
- What safety signal phrases or notes should be added to avoid death, injury, or issues?
In Industry
You may not have the ability to choose what concepts need to be explained. For example, you may be tasked with writing a tutorial on how to use key company software for company employees as an in-house reference. Once you speak with your bosses (gatekeeper audience) about their expectations for the document and employees (primary audience) who will be end users (as discussed in chapter 2), you need to provide content that is usable for their purposes.
Remember, you are providing clear, concise information about how to use the software, so that the primary audience can do their jobs effectively. That may include simple content leading to very advanced content, and your document may end up being over 500 pages.
Stay in contact with the gatekeepers and primary audience and ask questions and request feedback as you write and design the in-house tutorial.
In School
Unlike industry, writing in school requires an element of assumption and creativity since you have identified a fictional audience and created a persona based on your own ideas. Despite that, as you write, make sure you provide only information that your audience will need.
For example, if you have determined that your specific audience are college students who have never used the technology before, then there is no reason to include advanced content. If your persona is 20-year-old Damarcus who has never used cloud technology in the past and has never used Google Docs, what information will he need to successfully use Google Docs? Would advanced content be useful to him? Probably not. Could it potentially confuse or frustrate him? Absolutely. What does this mean? You need to weigh the benefits with the cost, and if your audience could at all be confused by such content, then don’t include it.
Regardless, in both industry and school projects, the body of your tutorial needs headings and subheadings, content appropriate for the intended audience with clear explanations, steps, and definitions, and a logical organization for the software platform about which you are writing.
What is included in the conclusion?
Your conclusion should be brief yet allow your audience to know that they have completed the tutorial. You could add a congratulations to the conclusion, as well as to the end of each chapter if you wish.
The conclusion can provide an overview of the main elements of the tutorial and include links to more information if appropriate.
What is included in back matter?
Back matter is supplementary information that is not necessary in the body section but could be extremely helpful to the audience. The following are sections that can be included in your tutorial.
FAQ
A Frequently Asked Questions section is organized by question and then answer. The questions need to be asked as questions with question marks and should be from the user’s perspective in the second person. Consider your audience and think about what they may be confused about while using the technology.
Answer the question as clearly and concisely as possible to help your audience understand concepts and complete actions accurately.
Your FAQ heading needs to be a level one.
Troubleshooting Guide
A Troubleshooting Guide considers issues that a user may face and provides directions on what to fix. For example, if a user is having trouble downloading the app, what should they do to try to fix the issue?
This guide needs to be organized by the problem, from the user’s perspective, and then the solution written clearly and concisely with the intent to solve the issue.
Your Troubleshooting Guide heading needs to be a level one.
Glossary
A Glossary is a brief dictionary for difficult words, such as specialized terms (jargon), used in the tutorial. This page must be organized alphabetically, and you should create the definitions yourself. Do not use a source for this.
Your Glossary heading needs to be a level one.
Appendix
An appendix contains any extra information that facilitates audience understanding of the content but is not necessary within the body of the document itself. For example, you could include an appendix at the end of your document with links to more information. If you are writing a tutorial on how to use Word, you could link to other professional tutorials that explain Word tools or to Microsoft content. Your audience doesn’t need these links to successfully understand your content, but they may want to explore more information.
If you include multiple Appendices, you will include similar information on multiple pages, and you would include level one headings as follows: Appendix A, Appendix B, Appendix C.
Index
An index contains a list of frequently used concepts and the page numbers on which they can be found. An index needs to be organized in alphabetical order and is extremely time consuming to create since you need to read your own document very carefully and write down individual page numbers to correspond with the words. An index is useful for long documents but is not required.
How do you convert your document to a PDF?
If you are writing in Google Docs and before you convert your document to a PDF:
- Make sure you have finished the entire writing process, including peer review, revising, and editing for grammar, spelling, and punctuation
- Ensure that all of your formatting and design is appropriate for the genre, audience, and purpose of your document
- Create your Table of Contents (see the Table of Contents section of this chapter for instructions)
- To convert the Google Doc into a PDF
- Click File on the top toolbar
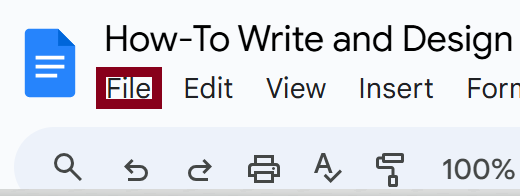
Figure 3.1.15 File tool - Hover over Download toward the middle of the new menu
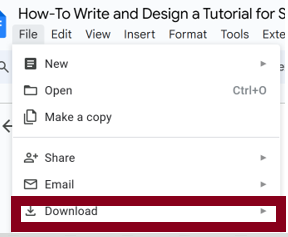
Figure 3.1.16 Click download - Click PDF Document (.pdf)
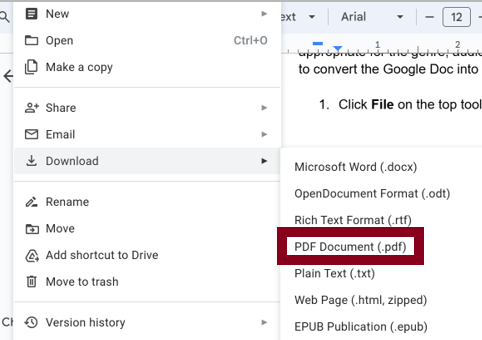
Figure 3.1.17 Click PDF
Google Docs will convert and download your PDF document, with a clickable Table of Contents.
Media Attributions
- toc
